
- Suspension
- Be the first to comment!
- Read 13178 times
Lowering guide
The Rover Metro K-series’ suspension system consists of four Hydragas units. These units are linked from front to back on each side. There is more weight in the front of the car due to the engine which is why when people let fluid out the system the front always sags…the weight pushes the front down, pushing fluid to the back which compounds the problem. This highlights one of the major points to remember when we lower the car; the back on Metros is always higher than the front. To counteract this natural effect of having more weight in the front, we have to lower the car more at the back to bring it all level.
68Difficulty6Tools required8Time required3Price
Parts required
- Wheel Brace
- Jack
- Axle stands (not compulsory but make it much easier)
- Medium sized container (sink basin sized)
- Socket set
- Hammer
- Flat blade screwdriver
- Selection of spanners
- Vice
- Measuring tape
- Hacksaw
Firstly, well done for having a go at this yourself. Secondly, don’t worry about messing it up. You won’t be doing anything that can’t be undone, the very most you’ll need is a new displacer from a scrappy if it goes the way of the pear. Right, here goes then.
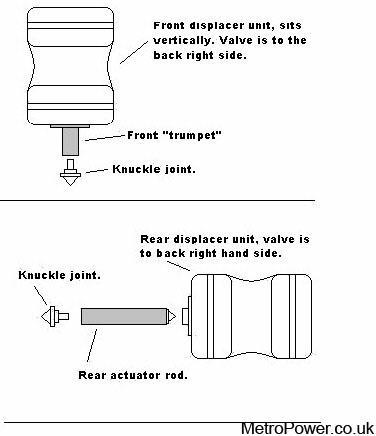
The basic layout of the Hydragas units can be seen in the picture below. I have not included certain parts which are present but I will include them later when things get more complicated. So that is the basic setup of the suspension system. The grey shaded parts are the bits we will be machining later on; the trumpet and the rod.
Did you hate ratios at school too?
Due to the manner in which the suspension is actuated we can employ a ratio system to calculate how much material we must cut from the suspension units to achieve our desired drop in ride height.
On the front since the unit sits vertically in relation to the angle of actuation (it sits up and down to you and me) the ratio is 3:1. That means if we wanted to lower the car 30mm at the front we would cut 10mm from the grey bit on the drawing.
As I mentioned earlier, Metro’s always sit higher at the back. So we use a higher ratio to counteract this. At the back we work with a 5:1 ratio, so if we want to lower the back of our Metro 30mm we would remove 6mm from the grey rod. See, it’s not that hard is it?! Well yes, it’s about to get a whole lot more complicated.
So, we know how to lower, but how do we stiffen it?
Well this is the hard bit. Removing the displacers and machining them to lower the car is fine, but you don’t stiffen the suspension at all. You will get an improvement in handling just by lowering since you lower the cars centre of gravity but for a real improvement we need to make the suspension harder. To lower and stiffen a Metro you have to remove enough material from the rods and trumpets to lower the car too much. You then pump a higher than normal pressure back into the suspension to bring it back to your desired ride height. So it’s lower but stiffer as well. The problem arises when you try to bring this factor into your calculation…how much more do I cut?
Well, I have found that a less scientific way to do it is to remove enough material to lower the car 1 inch further than you want it to be. So for example if I wanted to lower my car 30mm at the front I would actually remove enough material to lower 55mm, do you see? At a 3:1 ratio that means I’d have to cut just a shade over 18mm from the front trumpet. When you then pump 450PSi pressure into the system instead of the standard 300PSi you should get your desired -30mm but +50% stiffness. Understand?
Rear Lowering procedure
- Decide how low you want the car to be. You should do your measurements with the wheels you intend to use on the car. The standard measurement from hub centre to wheel arch edge is 341mm at standard ride height with standard pressure.
Note: By far the best and most accurate way to calculate the drop is to take your car to a garage and get them to pump the suspension to your desired pressure (say 450PSi), once it’s up there then do your measuring to calculate the drop. That removes any guess work associated with the extra pressure vs. ride height thing. - With your figure in mind add 25mm to it. This will compensate for the extra pressure to stiffen the suspension.
- Get your calculator out. Take your figure for the front and divide it by 3, the resulting number is the amount you will have to cut off the front trumpet. Take your figure for the back and divide it by 5, this is the amount you will have to remove from the rear rod. Do not get these figures mixed up.
- Get your overalls on, the maths is done.
- Loosen the wheel nuts and jack up one side of the car. Support it on axle stands under the sub frame at each end. If you can, jack up the whole car and support it. Remove the wheels.We’ll deal with the back first, so if you can raise the whole car you can do both at the same time.
- Working underneath at the back, remove the dust cap from the Hydragas valve. Get your basin and place it under the valve and slightly behind. VERY CAREFULLY press the valve in with a screwdriver. Nuclear green stuff will fly out at you like a scene from Alien, don’t worry, it’s mainly water. Keep the valve in until nothing more comes out. Do both sides if you have the whole car lifted.
- Working inside the boot, unbolt the displacer retaining strap bolt. Now get underneath again and undo the other bolt holding the strap in place. This is a hard one to get, Rover made the bolt far too long so you can’t get a socket on it unless you have a special one. You might get it with pliers. I used mole grips, but it is hard. Remove the strap.
- Get your sockets out and the extension bar. Remove the four bolts holding the Hydragas retaining plates on. Three are facing you, one is underneath. Don’t worry about nuts on the back, they are captive nuts. Remove the plate. Unbolt the fluid pipe from the back of the unit.
- Now, this bit can be tough. Get down on your back and find the knuckle joint. It fits into the trailing arm underneath; you can see it through a hole in the sub frame or from right underneath. You have to split the knuckle joint from the rod. You might be lucky and it’ll already be split but I’ll work on the presumption that you weren’t :o) Get a screwdriver in and hammer them apart.
- Now you’re ready to remove the Hydragas unit from the sub frame. Remember those bits I talked about earlier that weren’t in the drawing? Well there is a big hard helper spring around the rod and a wee return spring inside the rod. Have a look at this picture for clarification. The best way to get the unit out the sub frame is to pull it hard, diagonally towards you. Wiggle it around a bit and get it out past the lip in the sub frame. Pull the unit right out. The rod will probably come with it, years of getting rammed into the unit tends to make it slightly reluctant to come the other way. Oh and you’re about to get soaked, there’s a load more fluid in there yet!
- You don’t actually have to take the rod out the unit, but if your vice isn’t big enough, get a screw driver in the slot between the unit and the rod and hammer them hard. Eventually they will split. Be very careful your screw driver doesn’t slip and puncture the bladder.
- Clean the rod and displacer while you’re at it. Now this is the tricky bit. Using your tape measure, mark on the rod the point at which you must cut it. Put the rod in a vice. I used the jaws of the vice as a straight edge and made sure the rod was flat with a spirit level. That meant I could cut down the jaw of the vice, I suggest you do the same since you have to get a straight cut.
- Depending on how low you’re going you may have to cut the little spring down a bit. Remove 3 coils.
- Time to stick it all back in. Relocate the knuckle joint back in the suspension arm. Grease it and the radium arm bearing while you’re there. Pop the little spring back inside the rod and locate the big spring on the displacer, you’ll see it sits on quite nicely.
- Stick the unit back in the sub frame, the reverse of removal is fine. It wont go in easily, it took me a good hour to get mine back in on one side but once I sussed the trick the other went in fine. You have to make sure the big spring is aligned properly or it won’t go in. You don’t have to compress the spring at all, so if it looks like you do it’s not aligned right. Put it all back in and stick the end of the knuckle joint back in the rod. It won’t go all the way in until the unit is reinflated.
- Push the unit into place as best you can and offer up the retaining plate. Locate the bolts and screw them in loosely to start with. Make sure the plate is centred correctly and do the bolts up tight. Screw the fluid pipe back on and refit the retaining strap.
Front lowering procedure
Now for the front,this is where it’s a little different if you own a GTi
(GTi owners) – open the bonnet and unbolt the screen wash bottle. Swing it out the way and get access to the shock absorber top mounts. Undo the shocker top mounts. Undo the bottom mounts on the upper arm and remove your shocks.
- Reach down the back of the displacer unit and undo the fluid pipe. Prepare yourself for another bath, put your basin under the car to try and catch the deluge.
- Undo the four bolts that hold the retaining plate on. Remove the plate.
- Pull the unit up and out. It can be in the back plate quite tight due to road dirt but pull it out. Pull it off the knuckle joint; leave the knuckle in the upper arm. Catch the helper spring. There may be a spacer between the knuckle and the unit, catch it too.
- You need a big vice here. Stick the whole unit in it and tighten it down. Cut the trumpet down ala your calculations earlier.
- Stick the helper spring back on the knuckle along with the spacer. Offer the unit back up, it should go on with no hassle. Make sure the valve points in the right direction to connect back up to the pipe.
- Bolt the plate back on and reconnect the fluid pipe.
- (GTi owners) – Refit your shock absorbers, top first. Do the bolts up loosely first then fit the bottom mount. Tighten the bolts up.
- Let the car down off its axle stands/jack/blocks of wood. Have someone come out and reinflate the suspension or drive very very slowly to a garage and have them inflate to your desired pressure/ride height.
So there you have it, I hope a complete guide to lowering your car. My advice is to take your time, measure and measure again. Check twice, cut once.
Guide written by Fraser